
Load and retarget
The MakeWalk user interface is located in six panels in the Tools shelf. In the Main panel, we find a single button labelled Load And Retarget. Press this button, select the same bvh file as in the previous chapter, and wait until the animation is loaded.

The first frame in the loaded animation is frame 1. At frame 0 the character is in T-pose. This pose is used for reference and as a part of the retargeting process.
Fixing defects
Retargeting is never perfect, because the target armature and the original actor may have different body proportions and bone locations, or because we want the character to do something slightly different than the original bvh file. Tools for editing the action are found under the third MakeWalk panel, labelled Edit Actions. This panel is closed by default.

The first editing we will do is to correct a glaring defect: in frames 10 and 11 the right thumb and index finger penetrate the left thigh. We will fix this problem by adding a local shift to the right upper arm animation. This is done in the Displace Animation section.
- Press Start Edit. The button becomes inactive and the other buttons in this section become active instead.
- Select the right upper arm, upper_arm.fk.R (the bone may have other names if you don’t use the mhx advanced rig).
- Go to frame 7, where the pose is fine. Press the Rot button to insert a rotation key.
- Go forward to frame 14, where the pose is also fine. Press Rot.
- Go back to frame 10, and rotation the upper arm so there is no penetration. Press Rot.
- Scrub the timeline back and forth between frames 7 and 14, to verify that the animation looks fine.
- If the result is good, press Confirm Edit. Otherwise, continue to modify the keys. If the animation has been messed up, you can cancel the edit by pressing Undo Edit.

Looping and repeating the animation
The original animation only lasts about 1.5 run cycle, but we want the character to run longer than that. Identify two frames where the character is posed similarly. There will never be a perfect match, but the poses in frames 7 and 29 are similar enough. Go to frame 7 and insert a marker on the timeline, and then go to frame 29 and do the same. The part of the animation between the markers will be repeated.

The process consists of two steps. In the Loop Animation section, the beginning and end of the specified time range are blended together. Blend Range is the number of frames used for blending, whereas the Loc and Rot options specify whether location and rotation F-curves are affected by blending. If the Loop in Place option is enabled, the average velocity is subtraced from location F-curves, making the character run in space. This is not what we want, so we leave this option unchecked.
In the Repeat Animation section, the button Repeat F-curves copies the F-curves between the two outermost selected markers. All keyframes after the second marker is lost, so make sure that you are not interested in this data.
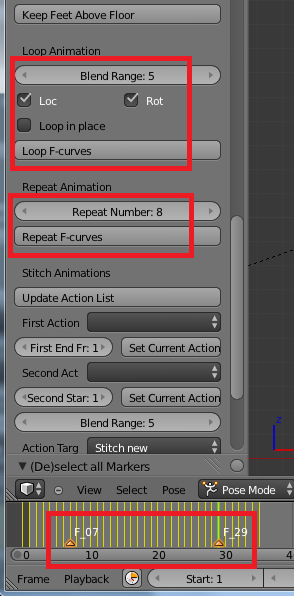
Enable the markers at frame 7 and 29 to specify the time-range to be repeated. Press Loop F-curves to smoothly blend the animation from frame 29 to frame 7. Finally set the repeat number to 8, and press Repeat F-curves. The running animation now continues until 182.

Running on a floor
Our next goal is to give the character a floor to run on. This can be quite tricky, because when the a foot rests on the floor, it must neither sink into the floor nor float above it. Shadows give the viewer a clear visual cue where the feet are relative to the floor, so it is difficult to cheat. MakeWalk has a tool to adjust the animation to make feet stick to the floor without penetrating it.

First add a plane that acts as the floor, and scale it up so the character has something to run on. The character floats a small distance above the floor. The MakeWalk tool lifts up the character when some part of a foot is below the floor, but it does nothing when both feet are above it. We must therefore first move the animation down a bit.
Move to a frame where one foot is supposed to rest on the floor. Select the root bone in the hip area, and move the character down so the foot is below the floor. Then press Shift Bone F-curves in the Global Edit section, to make the shift affect the entire animation. Make sure that the markers on the timeline are deselected, because otherwise the global shift will only affect the specified time range. This is easy to forget, but fortunately easy to detect and fix. If you find that a tool only affect part of the animation, press Ctrl-Z a few times and repeat the steps with the time markers deselected.

With both the plane and the root bone selected, press Keey Feet Above Floor in the Floor section. The options above this button specify which foot must stay above the ground, and whether the hips should be moved correspondingly. The Hips option should always be selected when the legs are using FK, and normally we want both the left and right foot to stay above ground. Again make sure that all time markers are deselected, because we want the feet to stay above the floor during the entire animation.

The character now runs on top of the floor, but the animation is somewhat strutty. This often happens when the hips are moved. A better result can be achieved if only the feet are moved above the floor, without affecting the hips movement. To this end, we must first transfer the animation of the FK bones to the corresponding IK bones. In the Inverse Kinematics section at the top of the Edit Actions panel, press Transfer FK => IK. The transfer process takes quite a bit of time, and you can follow the progress in the terminal window if Blender was started from there. Again make sure that no time markers are selected, because then only the animation in the specified time range is transferred.

The legs are now in IK mode. Deselect the Hips option in the Floor section, and press Keep Feet Above Floor. This time the feet stay above ground, but the hips animation is unaffected.

However, the result is still not what we wanted, because now the character is kneeling when he runs. We could fix that by making a global shift to the root bone F-curves. Alternatively, we can undo the last step, and move the root bone and the IK feet up before keeping the feet above floor.

